Basic Cpanel Guide
cPanel is a product for Linux stage to have and keep up sites via mechanizing particular assignments.
cPanel controls the greater part of the destinations on the web.
In their official site, they have said that
Every six seconds a new domain is Hosted using cPanel server.
Cpanel may look like extremely complex one for individuals who are new to hosting.
However:
It is anything but difficult to utilize.
Here I will demonstrate to you proper methodologies to utilize the apparatuses in cPanel.
cpanel instructional exercise
This cPanel instructional exercise will give all of you the directions to effectively deal with your cPanel account.
Here you will figure out how to utilize essential devices and alternatives in cPanel.
To begin with Let us perceive how hosting server functions.
People-> Internet-> DNS->Hosting Server.
The above pecking order is the essential model of how the web functions.
Past that, a considerable measure of programming, equipment and people are working all the day and all an opportunity to give the web benefit.
cPanel is one of the product which handles hosting elements of the site.
Here are the as often as possible required undertakings which you can complete in cPanel. It will give you a thought of what cPanel can do.
Step by step instructions to Change cPanel Password
You need to change the watchword of your cPanel to secure it every now and again. The cPanel is available from your space URL.
There are three ways you can get to the URL.
1) Adding cPanel toward the finish of area URL
For Example http:
2)Adding “cPanel” before the space.
Example: http:
Accessing by means of Port
There are predefined ports to get to cPanel. Here are they
You can utilize the port toward the finish of the URL with: and you ought not utilize/
http://domain.com:port number
Hostlelo Premium CPanel url https://server.hostlelo.net:2083
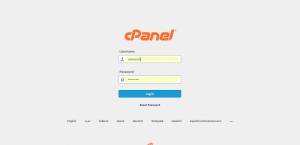
One the cPanel login page opens, enter your login accreditations and sign in.
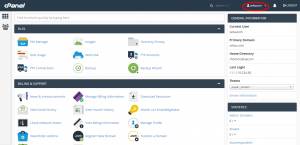
In cPanel dashboard, you can see a great deal of capacities. Give us a chance to talk about every one of them in underneath areas of this instructional exercise.
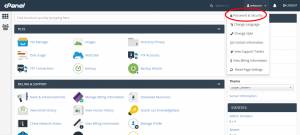
In the correct top, your username will be appeared. Tap on it.
In the drop down menu, you can see the Password and Security as the primary Menu.
Tap on the Password and Security choice.
Now:
You can change the password using the Password& Security wizard.
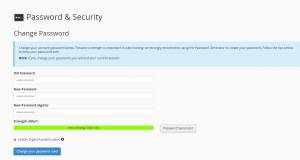
You need to enter your present secret word and new watchword.
After that tap on “Change your Password Now” catch.
You can utilize their secret word generator to make an extremely solid watchword.
While making another watchword, read the direction given by cPanel group.
You could see the Digest Authentication alternative there.
Process validation is just for destinations which don’t have SSL.
On the off chance that you have SSL from Certified specialist and can make SSL association over the port 2078, at that point you needn’t bother with Digest Authentication.
Step by step instructions to Update Contact Info
You ought to include mail ids in contact data of cPanel to get notices. This is critical as the cPanel can send the warning with respect to alarms.
Here is the way you can do it.
Go to the User Preferences menu( Click UserName) on the correct top and tap on Contact Information.

You need to add an email deliver to get account warnings and secret key reset notices.

Don’t use mail id which belongs to that cPanel account. Use and Independent email id.
Add a second email id. You will receive email notifications same as your first emails.
Here are the actions for which the email notification will be sent to your mail.
- Account Creation
- Account Removal
- Account Suspensions
- Account UnSuspensions
- Account Upgrades/Downgrades
- Altered RPMs Check
- AppConfig Registration Notifications
- Backup Delayed
- Backup Failed To Finish
- Backup Failure
- Backup Successful
- Backup Transport Error
- Bandwidth Data Processing Timeout
- Bandwidth File Conversion Disk Space Failure
- Bandwidth Limits
- Branding Migration
- ClamAV Upgrade Changes
- CloudLinux License Detected
- Conversion of cpupdate.conf settings to local.versions
- Conversion of cpupdate.conf Settings to local.versions (legacy notification)
- Convert Addon Domain to Account Notifications
- Corrupt Database Tables
- cPanel Account Password
- cPanel Backup
- cPanel Backup (legacy notification)
- cPanel Backup Destination Disabled
- cPanel Backup Destination Disabled (legacy notification)
- cPanel Configuration Checks
- cPanel Update Failures
- cPHulk Configuration Issues
- cPHulkd Brute Force
- cPHulkd Login Notifications
- cPHulkd Notifications
- Database Deprecation Notifications
- Dbindex Cache File Out Of Date
- Digest Authentication Disabled Due to Account Rename
- Disk Integrity Check
- Disk Usage Warnings
- DNS Cluster Error
- DNS Resolver Performance Issues
- EasyApache Configuration
- Email Client Configuration
- Exim Update Failures
- Filesystem Quotas Ready
- Forced Disable of Digest Auth
- Generic Notifications
- Greylist System Changes
- Horde Maintenance Notifications
- Horde Table Conversion Failure
- Hostname Change Notifications
- Hostname conflicts with a cPanel user account
- Hung Service Checks
- Installation of purchased SSL certificates
- Instant Message Failure
- Invalid Domains
- Invalid Hostname For Main IP Address
- IP Address DNS Check
- Kernel Crash Check
- Lost Contact With DNS Cluster
- Mail Server Out of Memory
- MyDNS Zone Import Failure
- MyDNS Zone Import In Progress
- MyDNS Zone Import Successful
- Notices concerning goods and services purchased via the cPanel Market
- Notification of New Addon Domains
- Notification of Outdated Software
- NSD DNS Zones Corrupted
- Package Extension Name Conflicts
- POP before SMTP enabled
- queueprocd Critical Errors
- Reboot To Enable Filesystem Quotas Reminder
- Recently Uploaded CGI Script Mail
- Remote MySQL Connection Failure
- Remote MySQL Server Notifications
- Root Compromise Checks
- Scheduled Backup Will Start Soon
- Script Terminated Due to Deprecated Call
- Security Advisor State Change
- Service failures (ChkServd)
- SSL Certificate Expiration
- SSL Certificate Expires Soon
- Stalled Process Notifications
- Stalled Statistics and Bandwidth Process Notifications
- Stats and Bandwidth Processing Errors
- Stuck Script
- System Log Approaches 2GB
- System Out Of Memory
- System Update Failures
- Uncategorized Notifications
- Unmonitored Services
- Update Blocker – Service Deprecation Notice
- Update Failure Due to Immutable Files
- Update Failures
- Update Version Blocker
- Upgrade Required – Service Is Outdated
- User Disabled Two-Factor Authentication
- User Disk Usage Warning
- User Enabled Two-Factor Authentication
- User Theme Update
Step by step instructions to Change cPanel Style
Go to the cPanel and tap on the username at the correct top.
A drop down menu will show up.
Starting from the drop Menu, Select Change Style

The Change Style wizard will open

You can see the four types of style
Click on Apply.

The style changes will be connected and the pages will likewise be reloaded to the chosen style.
Step by step instructions to Change Language
Many hosting suppliers generally utilize cPanel. Individuals from different nations are utilizing cPanel.
The cPanel group has been giving numerous dialects to utilize them as UI dialect in cPanel.
Here is the list of languages which cPanel gives.
- Arabic (العربية)
- cs Czech (čeština)
- da Danish (dansk)
- de German (Deutsch)
- el Greek (Ελληνικά)
- en selected selected English
- es Spanish (español)
- es_419 Latin American Spanish (español latinoamericano)
- es_es Iberian Spanish (español de España)
- fi Finnish (suomi)
- fil Filipino (fil)
- fr French (français)
- he Hebrew (עברית)
- hu Hungarian (magyar)
- icpanelsnowmen
- cPanel Snowmen – icpanelsnowmen
- id Indonesian (Bahasa Indonesia)
- it Italian (italiano)
- ja Japanese (日本語)
- ko Korean (한국어)
- ms Malay (Bahasa Melayu)
- nb Norwegian Bokmål (norsk bokmål)
- nl Dutch (Nederlands)
- pl Polish (polski)
- pt Portuguese (português)
- pt_br Brazilian Portuguese (português do Brasil)
- ro Romanian (română)
- ru Russian (русский)
- sv Swedish (svenska)
- th Thai (ไทย)
- tr Turkish (Türkçe)
- uk Ukrainian (українська)
- vi Vietnamese (Tiếng Việt)
- zh Chinese (中文)
- zh_tw Chinese (Taiwan) (中文(台湾))
They are the default set of languages in cPanel.
Be that as it may, you can straightforwardly contact cPanel group to introduce your language on the off chance that you don’t have the language as a matter of course.
When you select the language starting from the drop menu, tap on change.
Presently:
The cPanel spares the language changes and reload the page with your picked language as the interface.
You can likewise observe the choice to change the dialect in cPanel Preferences choices in Menu.

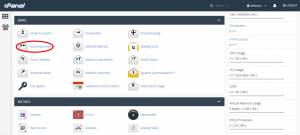
Managing E-Mail
Instructions to Create Email Address
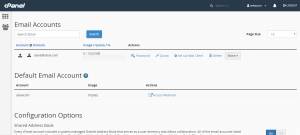
You can make numerous email address for your space utilizing cPanel.
Go to the email segment in your cPanel
Select Email Accounts alternative

Now:

Enter the name for the mail id that you need to make
Enter the password or create the solid watchword utilizing their inbuilt device.
At that point:
You can settle the space prerequisite for the email
Or, then again
You can set the limit to Unlimited.
All things considered:
Tap on Create Account.
How to Manage Email Account?
You can do the accompanying activities while dealing with your email account.
Change the Password of the email.
In the event that you need to change the password, go to the email accounts areas.
There you can see the list of email records.
From the list click on password options which correspond to the email account for that you want to change the password.

Now, create the strong password.
Then, click change the password.
Change the Quota of the email
In the event that you feel that space is deficient for your email account, you can build it. Tap on Quota
You can determine the Quota
Or, on the other hand
Set the Quota to Unlimited

From that point onward, Click on Save.
####Delete the email account
In the event that you needn’t bother with an email id any longer, you can erase it.
It will free up space
To erase the email id, tap on the delete option relates to the mail id.

How to Access Email by means of Webmail?
Webmail enables clients to get to the email id they made through any program with web associations.
You can access your webmail using the following format
https://yourdomain.com:2096
or, on the other hand
You can replace port number with/webmail
Now:
The webmail login board will open

Enter your username: your area mail id
Password: Domain mail id’s password.
At that point tap on login
That is all now the email dashboard will open.
You can play out all the mail activities, for example, make another mail, send letters, erase mail, and so on.

To avoid the frequently receiving spam emails, you can use SpamAssassin in cPanel.

It is an automated tool to detect spams.
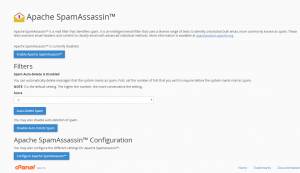
Enable the SpamAssassin to begin the capacity. You can set up scores to discover spam messages.
You can set up a different organizer for spam messages
Or, on the other hand
Naturally erase them.
You need to setup a spam score to recognize the spam messages.
Black_List
You can Specify email ids to stamp them as spam since a few messages ought to be set apart as spam filter yet they escape from filters.
White_List
A few messages are dishonestly distinguished as spam. We can reject those mail addresses and make the messages to arrive in our inbox.
The most effective method to Setup Email Forwarders
Email forwarder is required when you are in need to forward one approaching mail to another email.
You can add different messages to forwarder list.
Next:
Go to the email area and tap on Forwarders.

There will be two options.
- Add Forwarder
- Add Domain Forwarder
Click on Add Forwarder.

You need to include address and Destination.
Address :
Include an email address (The Email resulting in these present circumstances mail id will be sent)
Destination:
Enter the mail to get the sent email.
Or, on the other hand
You can drop the email and make an impression on the sender of the email.
Domain Forwarder:
It advances the whole messages which are gotten by all the email ids has a place with that domain.

Choose the domain and add the email id to forward.
How-to Setup Auto Responders?
Automated assistants are basic to react back to the messages you get amid your nonworking day( You might be out for the excursion).
Every single email is imperative when you are ready to go. Be that as it may, you can’t react back to every one of the messages while you turned out for unwinding or satisfaction.
This circumstance will give you a chance to lose some great open doors.
Is there any approach to stay in contact with your messages without using them?
Yes, The Auto-Responders will carry out the Job for you.
Simply set up an email format with cool words in Auto Responders.
When you are away, the automated assistants will forward the email to the sender.
Along these lines, they will wind up in getting the reaction from you.
Here is the manner by which.
Go to the email segment
Tap on the Auto Responders
If you have any autoresponders previously, it will be shown below in Current Auto Responders Section.
To Create a new one, Click on Add Auto Responders.

Now:
The Auto Responder Wizard will open

You need to fill the All the points of interest and Message Body
Time Setup:
You can begin Immediately or can set a custom time to begin the automated assistant
For end time you can stop whenever or set up an opportunity to stop.
At that point Click on Create.
How-to Setup Default Address?
Default Addresss is vital to get and handle messages which are sent to the domain mail which does not exist.
This will help you to maintain a strategic distance from spammers.
It will likewise help in accepting messages for an old email id which is dropped.
Along these lines, you won’t miss any essential messages.
To begin with, Click on Default address from Email Section.
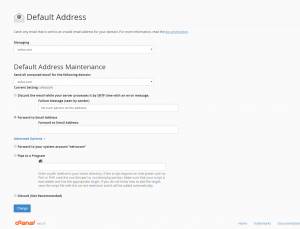
You will see some two main option.
Discard the message with a reply to the sender.
Or
Forward the message to another active mail.
Add what message to send to the sender when you dispose of
Add an email to forward the email, If you choose to forward,
Note: You can simply dispose of the message with no answer.
However, is not suggested.
From that point onward, tap on change.
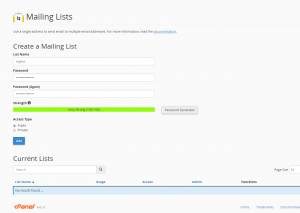
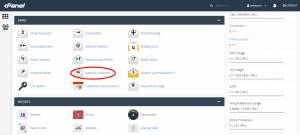
How to Create Mailing Lists?
The Mailing list helps you to send multiple emails from a single email.
Click on the mailing lists from Email Section.
Now:
The Creating Mailing list form will open.
Add a secure Password and Select an Access Type.
Set it Private or Public.
Then click on Add.
How-to Setup Filtering on User Level?
User Level Filtering can be done through the following Instructions.
Go to the Emails Sections.
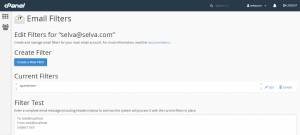
Click on Email Filters.

Click On Manage Filters.

Click on Create a New Filter.
Now:
The Filter form will open.
Add a Unique Filter Name.

There are rules to filter the emails.
You have to choose the action to apply to the email which is filtered.
The Rules has three sections.
- From
- Contains
- Input box
Here is the option in “From.”
- Subject
- To
- Reply
- Body
- Any Header
- Any Recipient
- Has not been previously delivered
- Is an Error Message.
- List ID
- Spam Status
- Spam bar Spam Score
Here are the options in “Contains.”
- Matches regex
- Does not contain
- Equals
- Begins with
- Ends with
- Does not begin
- Does not end with
- Does not Match
- Is above (numbers only)
- Is not Above (numbers only)
- Is below (numbers only)
- Is not Below (numbers only)
Add Phrases to compare in the Input box.
The Action contains the following Actions
- Discard message
- Redirect to email
- Fail with message
- Stop processing rules
- Deliver to a folder
- Pipe to Program.
Setup filters according to your requirement and clicks create.
Step by step instructions to Trace Email
You can follow the messages from the conveyance endeavor from your cPanel.
Tap on Track Delivery from the Emails Sections.
You will see the Run Report Input box.

Put the mail id you need to follow and tap on run report.
You can see all sort of conveyance status by clicking demonstrate all.
Or, on the other hand
You can see the main Failedand Blocked messages.
The list will indicate you 250 messages followed status.
How to Import Addresses / Forwarders
You can import multiple mail ids. It will avoid adding individual mail ids.
You can use CSV or Microsoft Excel Format.
Click on Address Importer from Emails Section.
Step 1: Select email accounts.

Step2: Choose the CSV or MS Excel record to transfer.
From that point forward, click Next.
Next:
Select the domain and click next.
Presently, Review the data and click Finish.
You can take after a similar strategy to import forwarders
The most effective method to Set Up Email Authentication
Email authentication is should in nowadays.
Individuals discover a ton of approaches to spam and cheat you.
To avoid those spammers and con artists, you need to separate and recognize them.
Similarly, People are utilizing the messages to spam and cheat you.
To discover spam and modified messages, you ought to setup email authentications in cPanel.
There are two sorts of email authentications accessible there.
They are
- DKIM
- SPF
Here the DKIM remains for Domain key identifier.
It will check the mail that it was sent from the predefined sender and not adjusted anyplace in the center.
The sender makes the message by computerized signature utilizing the b.
At the point when the message achieves the collector, it will utilize DNS to recover the sender’s public key and confirms the sign.
On the off chance that the mark ends up plainly invalid, the message will be considered as spam.
Here is the way to empower DKIM:
Go to the email area in the Cpanel.
tap on the authentication.

Click the Enable button at DKIM to enable it.

Once it is activated, the option in the button will turn into disable.
If you want to disable DKIM, just click on the disable button.
SPF( Sender Policy Framework)
SPF is each other imperative apparatuses for the website admins to keep others from sending the mail with their domain name.
It encourages you in ceasing others spamming utilizing your domain mail. You can indicate the servers and IP address which are permitted to send messages *with your *domain name.
To empower the SPF, Go to the email segment and tap on authentication.
Underneath to the DKIM, you can see the SPF section.
Click on enable.
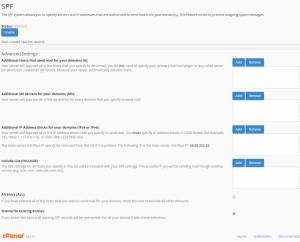
You can likewise disabled it in the event that you need.
In the event that, in the event that you facilitated your space at the mutual hosting your crude SPF record line ought to have the accompanying.
+include:spf.example.com.
In the event that you utilize, affiliate hosting account, your crude SPF record line ought to contain the accompanying line.
+include:spf.supercp.com.
On the off chance that there are no such lines on the records, take after the beneath steps.
You can see the section Advanced settings under the DKIM and SPF.
Now:
Click Add in include list row
A content box will show up, and you need to enter the following line.
In the event that you are utilizing shared hosting, at that point include the underneath line
spf.example.com.
In the event that, you utilize reseller hosting, include this line.
spf.supercp.com.
Now, click ok and save changes, at that point click update.
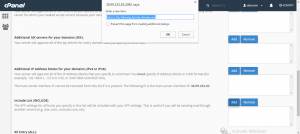
SPF has the advanced settings.
You can include hosts, servers and IP hinders in SPF utilizing Add.
Additionally, you can evacuate the hosts, servers and IP squares utilizing Remove.
Select All Entry to expel every one of the domains which are not designed in the SPF.
In the event that you need to overwrite current SPF records, tap on Overwrite Existing entries.
After that, click update.
The most effective method to Setup MX Records Entry
MX Records have been utilized to divert the approaching mail to another server.
In the event that your neighborhood server goes down, the MX records will divert the mail to the predefined server.
Tap on Email routing in the email section
The Email routing has four choices.

- Automatically detect configuration.
- Local Mail Exchanger
- Backup Mail Exchanger
- Remote Mail Exchanger
Here, We prescribe you to utilize Automatically detect configuration alternative.
The priority always will be zero by default.
But, you can change it.
Enter the goal and click on Add New Record

File Manager In Cpanel Guide
How to Manage Files in cPanel?
It is anything but difficult to oversee files utilizing cPanel. You can see the folders and files in your browser.
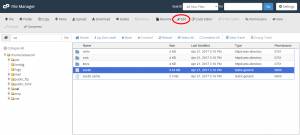
To Create/Edit/Delete files go to Files in segment in cPanel.
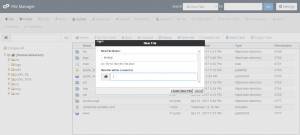
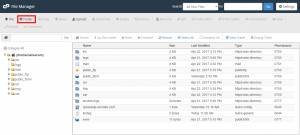
Tap on the File Manager.

You can see the file hierarchy on the left side and the files and folders in selected folder will be shown at the right side.
To create the file, click on the +File icon.

Give a name to file and mention with the extension.
Then click on Create New File.
To create Folder, click on +folder icon.
Give a name to the folder and choose the path where it has to be created.

That’s it in a nutshell. Presently your folder will be created.
On the off chance that you need to alter any of the files, tap on file.
Presently, a large portion of the file control symbol will end up noticeably dynamic.
You can see the edit option on the right side. Tap on it.
Now the Editor will open and you can use it.
You can also use the code editor to edit the HTML files.
Once you edited the file, just save the file and close it.
Right click on file also will give you the manipulation options.
File Permission Basics
You can see the file permissions of the considerable number of files on the right end.
The file permission is specified in numbers.
Three sorts of individuals are ordered here.
They are
- User
- Group
- World
To change the permission of any file , perfectly tap on it and tap on change permission.
Or, on the other hand
Select the file and tap on Permissions to set the permission.

You can set three type of permissions. They are
You can give these permissions to all kind of users.
However:
It is prescribed to take after the default permissions for all files.
In the event that you change any of the file permission, you must be cautious about whom you are giving permission.
Along these lines, when you pick permission, simply take after the suggestions to keep away from hazard.
Disk Space cPanel Guide
Step by step instructions to Check Disk Space Usage
In the event that you are site is dynamic and putting away the client information in any organization, you need to oftentimes check for the disk usages to guarantee your site uptime.
Since, if the disk space is insufficient, at that point you will wind up stuck in an unfortunate situation.
To check the accessible disk space in cPanel:
Go to Files area and tap on disk usages.

Now the disk space status will be shown.
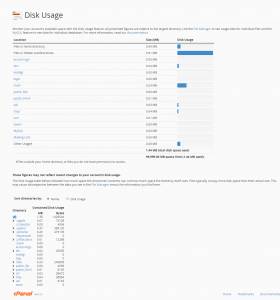
You can see which of your file has consumed more space.
If you click on the folder, you can see the files and folder size in it.

A folder may contain, multiple folders in it.
You can see all of their sizes.
FTP cPanel Guide
Instructions to Manage FTP Account
All cPanel accounts as a matter of course have their FTP accounts.
In any case, you can’t impart that to others as it is the essential account with every one of the authorizations.
All in all, What would you be able to do in this circumstance?
The arrangement is straightforward.
The cPanel gives you a chance to make a ton of FTP accounts with various authorizations.
Those FTP accounts can be gotten to from outsider FTP customer instruments.
FTP accounts let the clientupload, edit and remove files in the cPanel without getting to the cPanel.
It is simple for you. Is not it?
Tap on FTP Accounts from files sections.

Now:
Create an username and generate a strong password for the account.
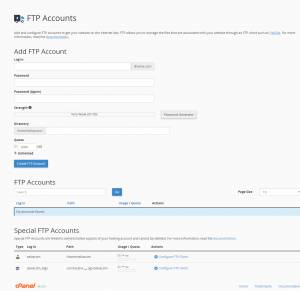
Note: You can set the permission while creating the account. There are two types of Permissions.
Note: If your server has authorized SSL certificate and the client can create the SSL connection, you don’t need to enable the digest authentication. ==
Otherwise, you have to enable the Digest authentication option.
Click on Create.
Now, you can see that your account is listed below.
Managing Files With Software
After you successfully set up many FTP accounts, you may give it to the respective users to access it.
Look:
You can access your FTP without cPanel and browser. For that, you need to have a FTP client installed on your system.
Filezilla is one of the most used FTP clients which you can use to access your FTP account from any system.
Here are the things you will require:
Filezilla installed in the client.
Host Name/IP/domain. FTP Username and Password.
If you are using FTP, enter port number 21.
Or
If you are using SFTP, enter port number 22.
Then, click Quick Connect.

How to manage your site in FileZilla?
Based on the permission given to the FTP account you access, you can perform the operations.If you have read and write permission, then only you can use the full utilities of FTP client.You can see the listed folders in the FTP client. The hierarchy will look the same as it looks in File Manager at the cPanel.
Click on any file which you want to edit(if you have read-write permission)
The right click will bring you the manipulate options.
You can edit, delete or create a new file using FTP client.

But remember one thing.
The changes you have made will reflect in the cPanel.
How to transfer files in FileZilla
There are two operations we do in Filezilla.
One is import, and other is export.
When you transfer a file from client to the cPanel, it will be called “uploading.”
If you transfer files from cPanel to your local system, then it is called downloading.
Click on File and select Export to download the file from remote FTP account.

Choose the file type and click ok

After that click on save.
To upload the file to the remote FTP account, Click File and Click Import.

Select the file to upload and click on Open.
That’s all. Now your file will be uploaded to the remote FTP account.
Backup your cPanel
Sometimes, your server may go down, and you can’t do anything with that.
Your file may be lost in that situation.
However, you can do one thing to avoid the data loss.
i.e Taking backup.
Yes, you read it right.
You should take backup of your site at regular interval. So whatever happens to your server or account, still you can come online using the last backup you have.
So, it is essential to take backup of your website to make it available anytime in case of any fault.
Here is how you can take backup of your website using cPanel.
In File section, Click on Backup.

In the Backup section, you can see the Download a Full Website button.

Ensure that the home directory option is selected.
Now click * Download a Full Website*.

If you do not want to receive email notification on the completion of backup, You have to select the Do not send email notification of backup completion.
Now, Click Generate Backup.
Then, you will see a message
” Full Backup in Progress … Once the full backup of your account has been completed, you will receive an email at the address you specified, “[email protected].”

Once the backup process is completed, you can see the backup file like this one with date and time of backup.
backup-4.15.2017_02-41-50_capnellab.tar.gz (Sat Apr 15 02:41:50 2017)
How-to-Use Backup Wizard
Backup helps you to take backup of the full website in the cPanel whereas the Backup Wizard helps you to take backup of your choice.
Using Backup Wizard, you can take backup of
->Home Directory
->MySQL Databases
->Email forwarders configuration.
->Email filters configuration.
You can also restore all of them again using the Backup Wizard.
When you go for the Backup option, you can select the files to backup.
The files with backup choices are mentioned above. You can select any of them.
Here is how to use Backup Wizard in cPanel.
Select Backup Wizard from the Files Section.

There are three steps in the Backup Wizard.
They are
- Backup/Restore
- Full/Partial Backup
- Download
In this step, you have to choose whether you are going to take backup or restore the backup.

If you choose to backup, you will be moved to Full/Partial backup.

You can click on Full Backup or select the directories to Backup.
In the Download Wizard, Just click the download option and your file will be downloaded.

If you choose to restore, You have to select the type to restore.

and In the Last Step, you have to upload the file to restore.

How to Check Your Website Latest Visitors?
There are a lot of third party websites which will show you where your visitors are coming from with detail analyzed data.
But, still, you can see them using cPanel. But only latest 1000 visitors will be listed in cPanel visitors wizard.
Go to the Metrics Section in cPanel.
Click on Visitors.

There you will see your domains.
Select any domain or subdomain to view their 100 of latest visitors.

It will show you the IP, visited page and browser.
How to Check Your Website Bandwidth Usage
Bandwidth is the measurement of data transfer between the client and server.
You have to check the bandwidth usage in cPanel frequently.
If your bandwidth usage exceeds the limit, your website won’t be served to the requesting client. It means all your service will be stopped.
So, you should know how much bandwidth you used. cPanel provides this information.
To Access the bandwidth usage
Go to Metrics section and click on Bandwidth.

The Bandwidth Wizard will show your bandwidth usage for last 24 hours, Past week and Past Year.

How-to use Webalizer
Webalizer is used to show the statistics about your website.
It shows visitors and where they are coming from.
It also shows you where the traffic comes from(* referring URLs*)
It shows the browser information.
The Graph has been shown using the following categories.
->Hits
->Files
->Pages
->Visits
->Sites
->Kilobytes
The Graph is complex as it contains various data.
It will help you to analyze your website visits.
To Access the Webalizer, Go to Metrics section and click Webalizer.

Now the Webalizer wizard will open.

How-to Get Raw Access Logs
It is very easy to access the Raw Access Logs in cPanel.
The Raw access logs show you the visitors data without any graphs.
To save the Raw Access Logs and see it later, you have to configure the logs.
If you don’t configure, it will not be saved.
To access the Raw Access Logs, Click on Raw Access in Metrics section.

Now, you can see the Raw Access Logs below the Download the Current Raw Access Logs.

In configure logs settings, you can archive the last 24 HR logs in the home directory.
Also, you can remove the Raw Access Logs at the end of the each month.
You can download the compressed version of error logs and see that on your system by uncompressing it.
How to Choose Log Program.
cPanel provides you with three types of log Program.
They are
You can enable them in your cPanel.
To Choose the Log Program, Go to Metrics Editor in the Metrics section.

You can see the list of available log programs there.
Select any program which you want to use by checking the check box.
Then Click Save.
This option is only available if your web hosts enabled it. Otherwise, it will be shown up in locked icons.

How to Use Awstats
Awstats shows you the visitor count and bandwidth usages of them using Graph.
You can see the difference by month and compare them very easily.
Go to the Metrics and Click on Awstats.

Now, The website visitor metrics will be shown in the graph.

Secure Your Websites
The Internet world has a lot of threats and most of them are from hackers.
Hackers can hack your site, steal your site and take your site down.
It will happen if you are less care about your site.
You can still prevent hackers from stealing your data by reducing the possibility by double checking your security levels.
How to Create Password Protected Directories in cPanel?
You can secure your specific directories by preventing the access to everyone.
It can be done by enabling password protection to that specific directory.
You have to give a name to the directory and setup username and password for the directory.
The Name that you have given to the directory will be displayed when the username and password prompt appear for the directory.
Go to cPanel, Click on Directory Privacy under the File section.

You will see the list of Directories on the cPanel.

Select the directory to set the password.

Set the name for the directory under security settings and click save.
Set User Name and Password under the Create user section and click save.
How to Deny Access Based on IP Address
Hacker can not only steal your data, but he can also take your site down by initiating the brute force attack.
IP-based blocking helps you to prevent brute force attack by blocking the range IP address from accessing your site.
To block particular IP address, Go to the Security section and click on IP blocker.

You can add a single or IP range in * Add an IP or Range*

You can add IPs in the following format.
If you want to block only one IP
Then enter IP address
E.g 192.168.0.1
If you want to block a range of IP address
Enter ** starting IP address-Ending IP address.
E.g 192.168.0.1-192.168.0.40.
The other formats are
Implied Range
192.168.0.21-45.
CIDR Format
192.168.0.11/35
Implies 192...*
180.
Here, the cPanel will block all the IPs that starts from 180.
Even, if you enter a domain, it will be resolved to an IP address and the request from the IP address will be blocked.
How to Protect Against HotLink?
You know others can access files from your site using their corresponding URLs.
Here the image will be fetched from your website. Here, your bandwidth will be used for all the times.
To prevent this, you can use the hot link protection option in cPanel.
So, only the websites you specified will be allowed to access your file.
To do that, Go to Security section and click on Hot Link Protection.

The Hotlink Protection Wizard will open and you can configure.

In the configure Hotlink Protection box, you have to add the websites which are all allowed to access your web files.
Add the extensions which you need to block from the direct access.
You should not entirely block the direct access.
Choose Allow Direct Request
*Here you can access files from the browser directly by using the corresponding URL.
You can also redirect the incoming request to another URL.
After you enter all the details, just click on Submit.
If your hotlink protection is disabled, Click on Enable.
That’s all. Now onwards, others can’t steal your bandwidth.
Manage Your Domains From cPanel
How to Create Subdomains in cPanel?
Subdomains are very useful and it helps you maintain a separate website with the same domain name.
You can choose, any of the prefixes you want.
E.g blog.poweruphosting.com
To create a subdomain, Go to Domains section in cPanel and click on the subdomain.

Now, The Subdomain wizard will open.

In create subdomain section, enter the name for your subdomain and select the domain to which the subdomain has to associate.
The Document Root will be automatically created and you just click on create.
Now, your subdomain will be created.

You can also manage your subdomains in the same section.
How to Add Addon Domains
You can add the additional domain to your cPanel. This process can be done through Addon Domains option in the cPanel.
Your hosting service provider will specify the maximum number of addon domains which can be added to your single cPanel account.
To add additional domains, Go to the Domains section in the cPanel.
Click on Addon Domains.

Then Enter * the new domain name, Subdomain name and document root*.
If you want to create an FTP account for the new addon domain, just select check box. If not, let it remain unchecked.

Now click on Add Domain.
How to Set Parked Domains
The Parked Domain in the previous version is changed to Aliases in the current version of cPanel.
Using Aliases, you can show one domain content in another domain.
For E.g http://yoursite1.in and http://yoursite1.org can show the content from http://yoursite.com.
To park a domain, Go to Domains section in cPanel and Click on Aliases.

Now the Aliases wizard will open.

Under create a new alias, enter the domain name to park.
After that, Click on Add.
Now, you have parked the domain.
How-to Set Redirect?
If you want to redirect a web page request to another web page, you can do that task easily using redirect option cPanel.
Go to Domains section, Click on Redirect.

Now, The Add Redirect Wizard will open.

Choose the type of Redirect you want to do
1.Permanant(301)
2.Temporary(302)
Once, you choose the type, then go for choosing the domain to redirect.
Now, enter the domain to which the request will be redirected.
Under www.redirection, there are three options given.
- Only redirect with www.
- Redirect with or without www.
- Do Not Redirect www.
Choose any of them.
If you need wildcard redirection, check the wild card redirect box and click on *Add.
Managing DNS with Simple DNS Zone Editor
Using Simple DNS Zone Editor you can associate the domain with an IP address.
All domains have an IP address. you are setting a record, for your user to resolve your domain.
Each record associates domain with an IP.
Go to Domain section and click on “Simple Zone Editor”.

Under Add an A Record, enter the domain name and IP address and click on Add an A Record.

Now the record will be added.
The CNAME record resolves the multiple domain addresses and points to them to the same address.
Enter the domain name and IP under Add a CNAME Record.
Now, click on Add CNAME Record.
Now the CNAME Record will be added.
Manage Your Databases From cPanel
How to Create MySQL database in cPanel?
Go to Databases section in cPanel. Click on MySQL Databases.

Under Create Database Section, Enter a name for your databases and click on create databases.

The database will be created.

you can view that under current database section.

You can rename or delete the database in the same section.
How to Create users in the MySQL database?
To create users go to Databases section and click on MySQL Databases.

Under Add New User Section, Create the username and password for the user and click on Create User.

Now, The database user is created.

How to Add User to MySQL database?
Go to Database Section and click on MySQL database.

Under Add User to Database, Select the user from the list and choose a database to add the user and click on add.

phpMyAdmin
phpMyAdmin provides you with the UI to handle databases.
It is simple and no need of coding but phpMyAdmin still provides you with the coding section where you can execute commands on the database.
How to create a table in phpMyAdmin?
Go to Databases section in the cPanel and click on phpMyAdmin.

Now the phpMyAdmin will open and you can see the existing database hierarchy on the left.

Click on Any database for which you like to create a table.
If it already has the table, it will show you the existing table.
Under Create Table section, Enter a name for your table and enter the number of columns you need to add to the table.

The Table structure will open where you have to enter the name in each column and select data types.

Fill the necessary fields and click on save.
Now, the created table will be shown under the table list.

How to Delete a Table in the Database?
Go to the database and click on phpMyAdmin.

Now Select the database where your table exist.
The tables in Database will be listed there.
Click on the drop table.

It will ask you whether to delete. Click ok.

Now the table will be deleted.

Remote MySQL
Remote MySQL allows you to share your database access to another host.
Go to Databases section and click Remote MySQL.

The Remote MySQL Wizard will open.

In the Add Access Host Section, add a domain name or IP address for which you want to grant access to the database.

Click Add Host.
How to remove a host from access host list?
When you no longer provides access to a database for a specific host, you can remove the host from the access list.
Once you remove the domain or IP from the list, they can’t access the database anymore.
Click on Remote MySQL in the Database section.

You can see the access host list below the Add Access Host section.

Find the Host you want to remove and Click Delete.

The wizard will ask you
“Are you sure you wish to permanently remove “yourdomain.com” as an access host?”
Click Remove Access Host.

Now, the Host is removed from the list. It will show you the success notification saying ” Removed Host “host” from the access list.

Software / Services
Perl Modules
How to Install Perl Modules using cPanel?
Go to the software section in the cPanel and Click on Perl Modules.

The Perl Modules Wizard will open.

If you know your required Perl Module, just type the name on Install a Perl Moduleand click Install Now.

If you only know about the function of the Perl module, just type the function name on Find a “Perl Module” and click Search.

It will show you the list of Perl Modules related to your search term.
Now go through it and find your required module and click install. The module will be installed.

There is a list of available modules which you can see by clicking Show Available Modules

Click on Show System Installed Modules

It will show you the already installed modules along with their versions.
PHP PEAR Packages
You can install and manage the PHP PEAR Packages same like Perl Packages.
Click on PHP PEAR Packages at software section.

Find a “PHP Extensions and Applications Package.”

You can search for the PHP extension or you can see the available list of PHP extensions.
From the list, you can find and select your PHP modules to install.
Installing them are also very easy. Just click on install.

Now, The Module is installed.

If you know the exact name of the module, just type it in the box and Install a PHP Extensions and Applications Package, then click on Install Now.
Click on Show System Installed module to see the existing module.
Optimize Website
This option in cPanel helps you to compress the content.
You can select the MIME type of the content to be compressed.
Go to the Software section and click on Optimize website.

Three options are there.
- Disabled
- Compress All Content
- Compress the specified MIME types.

Choose any of them and if you choose the last option, make sure to add the MIME type and click on Update Settings.
Advanced
Apache Handlers
Apache handlers help Apache software to handle your website certain types of files and extensions.If there is a new extension or file type, you have to mention the file type and handlers.
Go to the Advanced section and click on Apache Handlers.

The Apache handlers wizard will open

Under Create an Apache Handler
Enter the handler and extensions.
Click Add
Now the extension is added to the list with its corresponding handler.

Index Manager
Index Manager helps you to show your web file in different ways.
Click on Indexes from Advanced Section.

Now, All the folders will be listed. Select a folder to change the index settings.

Here are the options for indexing

Default System Setting
- No Indexing
- Standard Indexing (filename only)
- Fancy Indexing (filename and description)
- Once you select the type of indexing for your file, click on Save.
Conclusion
Now you know how to perform various tasks in cPanel. It is very important for you to know the primary tasks to operate any tool.
Here, we have covered all the major tasks. Since cPanel has many options and tools, you may have more doubts.
Kindly let us know those questions in the comments.We will help you.